

Key Takeaways
Why These Spaces Are So Costly to Ignore
Most homeowners walk past their crawl space access panel and attic hatch dozens of times a year without a second thought. That invisibility is precisely what makes these two areas responsible for an outsized share of expensive repair calls. Moisture infiltrates silently, wood rots gradually, and pests colonize undetected - often for years - before a symptom appears in the living space above or below.
The pattern is predictable: a sagging floor, a spike in heating and cooling bills, or a musty smell finally prompts investigation, and by then the damage is extensive. Deferred maintenance in these hidden zones compounds faster than almost anywhere else in a home because conditions - humidity, temperature swings, and lack of air circulation - accelerate deterioration once it begins.
The good news is that the most effective interventions are straightforward and relatively inexpensive when addressed early. The seven maintenance priorities below cover what to look for, what it signals, and when to call a professional.
Check the vapor barrier in the crawl space
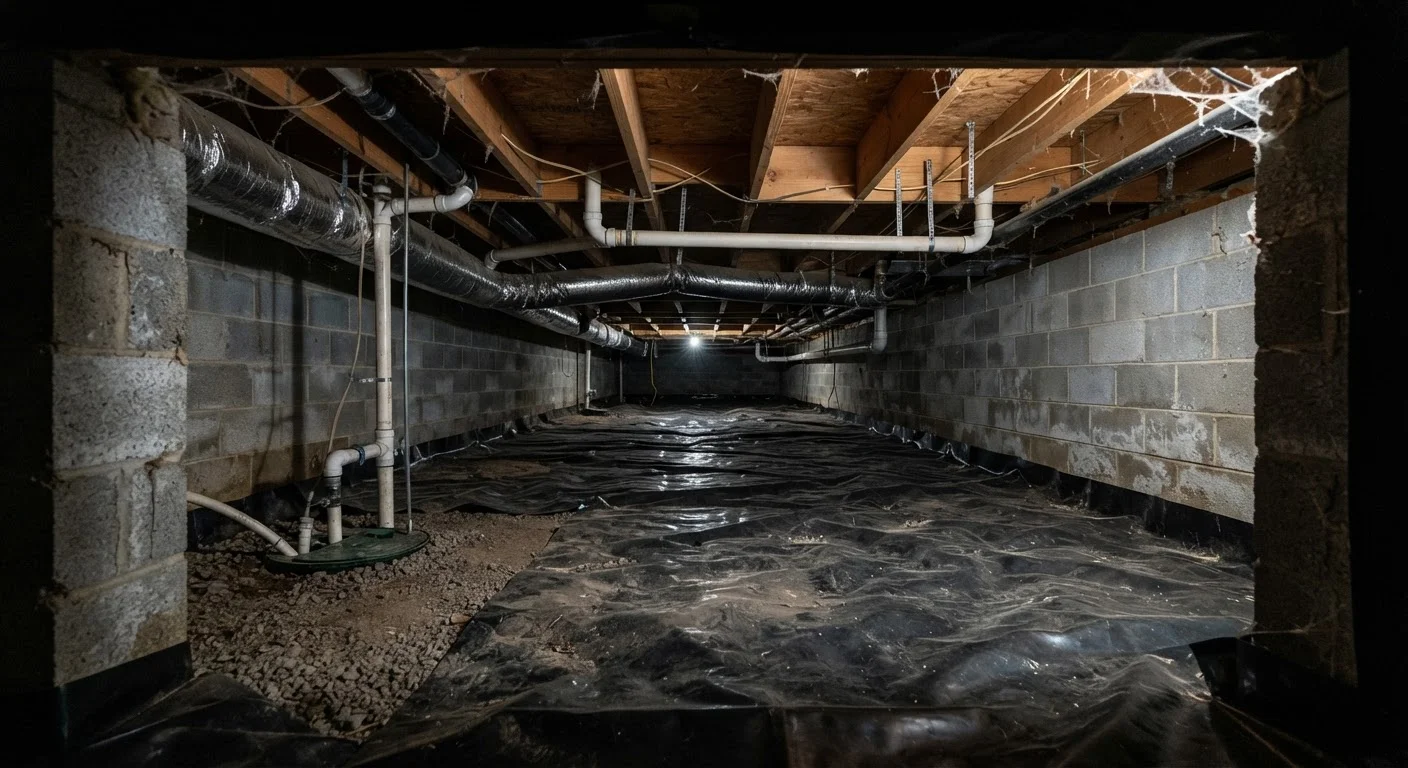
A vapor barrier - typically a 6-mil or thicker polyethylene sheeting - is the first line of defense against ground moisture migrating into floor joists and subfloor. Look for tears, gaps at seams, areas where the barrier has shifted away from foundation walls, or spots where standing water has pooled on top of the plastic.
Tears can be patched with compatible plastic sheeting and seam tape. Overlapping seams should be at least 12 inches and taped down. The barrier should run up foundation walls at least 6 inches and be secured with tape or mechanical fasteners. A compromised barrier allows relative humidity in the crawl space to climb high enough to support mold growth and wood-boring insect activity in a single season.
A torn vapor barrier can raise crawl space humidity enough to invite mold within a single season.
Inspect crawl space ventilation - or consider encapsulation
Traditionally, crawl spaces used passive vents in the foundation walls to exchange air and manage moisture. Current building science, however, has shifted toward sealed, conditioned crawl spaces in many climates - particularly in hot-humid and mixed-humid regions of the US - because outdoor air in summer often carries more moisture than it removes.
Inspect existing vents to confirm they open and close seasonally as intended and are not blocked by debris or pest nests. If you have a vented crawl space and are still seeing persistent moisture problems, consult a licensed contractor about whether a sealed-and-conditioned approach makes sense for your climate and foundation type. Either approach can work; mismatching the strategy to the climate is what causes problems.
Mismatching crawl space ventilation strategy to your climate is a common and costly error.
Look for pest evidence in both spaces
Crawl spaces and attics offer ideal conditions for rodents, termites, carpenter ants, and other wood-destroying organisms: low foot traffic, wood framing, insulation for nesting, and often easy entry points through gaps in the foundation or roof line. During inspections, look for droppings, gnaw marks on wood or wiring, disturbed insulation, mud tubes along foundation walls (a termite indicator), or frass - the fine sawdust-like debris left by carpenter ants and wood-boring beetles.
If you find termite mud tubes or widespread wood damage, contact a licensed pest control professional before doing any repairs - you need to understand the extent of the infestation first. Entry points like gaps around pipes and utility penetrations can be sealed with appropriate materials (steel wool packed before caulking, hardware cloth over larger openings) once an active infestation is addressed.
Mud tubes along foundation walls are a reliable early indicator of termite activity that demands professional evaluation.
Assess attic insulation depth and coverage
Inadequate attic insulation is one of the most straightforward causes of elevated heating and cooling bills, yet it often goes unexamined for years. The US Department of Energy publishes recommended R-value targets by climate zone - most of the continental US calls for R-38 to R-60 in attic floors, though older homes frequently fall well short of that.
With a ruler or tape measure, check the depth of your existing insulation (blown-in fiberglass or cellulose typically needs to be 10-15 inches deep to meet higher R-value targets). Look for compressed areas, spots where insulation has shifted away from eaves, or areas where recessed lights, attic hatches, or pull-down stairs have no coverage at all. These thermal gaps are disproportionately responsible for heat loss and gain. Adding insulation - particularly air-sealing first, then adding blown-in material - is one of the higher-return maintenance investments available to homeowners.
Air-sealing before adding insulation dramatically improves the return on every dollar spent on attic energy upgrades.
Check attic ventilation for balance and blockage
A properly ventilated attic relies on a balanced system: intake air enters through soffit vents at the eaves, rises as it warms, and exits through ridge vents or upper gable vents. This flow regulates temperature and moisture in summer and winter alike. Blocked or unbalanced ventilation causes heat buildup in summer that shortens roof shingle life, and in winter it can cause ice dams in cold climates and moisture condensation on the underside of the roof deck.
Check that soffit vents are not covered by insulation - baffles (rafter vents) should be installed between joists at the eaves to keep the airway open. Confirm that upper exhaust vents are clear of bird nests or debris. If your attic has multiple exhaust vent types (a ridge vent plus upper gable vents, for example), be aware that they can short-circuit each other; a building professional can advise on the optimal configuration for your roof geometry.
Insulation blocking soffit vents is one of the most common - and most easily corrected - attic maintenance failures.
Inspect HVAC ducts and equipment in both spaces
Many homes route HVAC ductwork through crawl spaces or attics - environments that can be extremely hard on the equipment. Flex duct is susceptible to crushing, kinking, and joint separation; rigid metal duct can develop gaps at connections over time. Leaky ducts in unconditioned spaces can lose a significant portion of conditioned air before it ever reaches living areas, directly inflating utility bills.
During your inspection, visually trace any ductwork you can access. Look for disconnected joints, visible gaps, or sections of flex duct that have collapsed. Duct joints in these locations should be sealed with mastic sealant or foil-backed tape (not standard cloth duct tape, which degrades). Also note whether ducts in these spaces are insulated - uninsulated ducts in an unconditioned attic or crawl space lose efficiency to the surrounding temperature. For a related maintenance task that is commonly skipped, see our guide to HVAC filter changes and their impact over time.
Leaky duct joints in unconditioned spaces can silently waste a significant share of your home's heating and cooling output.
Document what you find and establish a baseline
One of the most useful - and most overlooked - crawl space and attic habits is simple documentation. Take photographs during each inspection and date them. Note insulation depth, the condition of the vapor barrier, any staining on wood framing (which can indicate past or current moisture), and the position of any visible pest entry points.
This record serves two purposes. First, it lets you track whether a stain is growing or stable, whether a repair is holding, or whether a new issue has appeared. Second, it provides concrete evidence of maintenance history if you sell the home - a tangible asset during a home inspection. A well-documented crawl space and attic can meaningfully reduce buyer concern and support your position during negotiations. Pair this documentation practice with a broader seasonal maintenance checklist to keep your entire home's upkeep on a reliable schedule.
Dated photographs from each inspection create a maintenance record that protects you both financially and during future home sales.
Building It Into Your Maintenance Routine
Neither crawl spaces nor attics require frequent attention, but they do require consistent attention - ideally a brief inspection each spring and fall. Pairing these checks with your seasonal home maintenance schedule ensures they don't get overlooked. Fall is particularly important: you want to identify any moisture intrusion or insulation gaps before winter heating season drives up energy costs and freezing temperatures stress any compromised materials.
What to Bring Into These Spaces
Before entering a crawl space or attic, assemble a few basics: a bright headlamp (hands-free lighting is essential), knee pads and disposable coveralls for crawl spaces, an N95 respirator to protect against dust and mold spores, and a moisture meter if you want objective humidity readings. A phone or camera for documentation rounds out the kit. Never enter a crawl space after heavy rain without confirming there is no standing water, and always confirm there is no known mold infestation before entering without appropriate respiratory protection.
When repairs are needed, prioritize them honestly. A small vapor barrier tear or a missing attic vent cap is a weekend fix. Black mold growth covering more than a few square feet, signs of structural damage to joists or rafters, or any work touching electrical panels or gas lines in these spaces are jobs for licensed professionals. Getting this distinction right is one of the most money-saving decisions a homeowner can make. For a broader look at how skipping small fixes becomes expensive, see our overview of the true costs of deferred maintenance.
When Mold Is Present: Know the Limits
Visible mold growth on wood framing in a crawl space or attic is not a DIY cleaning project in most cases. The US Environmental Protection Agency guidance generally recommends professional remediation for mold covering more than 10 square feet. Beyond size, the type of mold, the extent of wood damage, and whether the moisture source has been resolved all affect what remediation requires. A licensed mold remediation contractor can assess the situation and recommend a scope of work; attempting to clean or encapsulate mold without first eliminating the moisture source will result in recurrence.