

Key Takeaways
Start here
Choosing the Right Tile Material
Next
Understanding Layout Patterns
Then
Substrate and Surface Prep
Core skill
Grout Basics: Types and Application
Before you buy
Planning Your Project Before You Buy
Choosing the Right Tile Material
Tile comes in a wide range of materials, each with distinct performance characteristics. Matching the material to the location is the first decision - and arguably the most important one.
Substrate
The surface layer beneath the tile - such as cement board, concrete, or plywood - that tile adhesive bonds to. It must be rigid, flat, and stable.
PEI Rating
A scale from 0 to 5 that measures how resistant a tile's surface is to scratching and wear. Higher numbers indicate greater durability for floor use.
Grout Joint
The gap left between tiles, filled with grout. Joint width affects which type of grout to use and influences the overall look of the finished surface.
Shade Lot
A production batch code printed on tile boxes. Tiles from different shade lots may have slight color variations, so matching lot numbers ensures a consistent appearance.
Uncoupling Membrane
A thin plastic mat installed between the subfloor and tile that absorbs movement and reduces the risk of cracks caused by floor flex.
Dry-Lay
Arranging tiles in their planned position without adhesive to preview the layout, check spacing, and identify problematic cuts before permanent installation begins.
Ceramic
Made from natural clay fired in a kiln, ceramic tile is easy to cut, widely available, and budget-friendly. It's best suited for walls and dry to low-moisture floor areas. Its slightly higher porosity means it's less ideal for consistently wet surfaces like shower floors.
Porcelain
Porcelain is a subset of ceramic but fired hotter and pressed under greater pressure, producing a denser tile with a water absorption rate below 0.5%. This makes it appropriate for bathroom floors, outdoor patios, and any space prone to moisture or heavy foot traffic. Check for a PEI rating of 3 or higher when selecting porcelain for floors.
Natural Stone
Marble, slate, travertine, and granite add visual character, but each requires regular sealing because stone is naturally porous. Variations in thickness can make installation more challenging. Natural stone is generally not recommended as a first DIY tiling project.
For a broader look at how tile fits within a full bathroom remodel, see our room-by-room bathroom renovation guide for context on sequencing and scope.
Understanding Layout Patterns
How you arrange tile on a surface is just as consequential as what material you choose. Patterns affect visual balance, the amount of material needed, and the complexity of cuts.
Grid (Stacked)
The simplest layout: tiles align in straight rows and columns. It requires the fewest cuts and is the most forgiving for beginners. It works well on walls with square tiles.
Offset (Brick / Running Bond)
Each row is staggered by half a tile length, mimicking traditional brickwork. This is among the most popular floor patterns and distributes weight and stress across joints more evenly than a stacked layout.
Herringbone
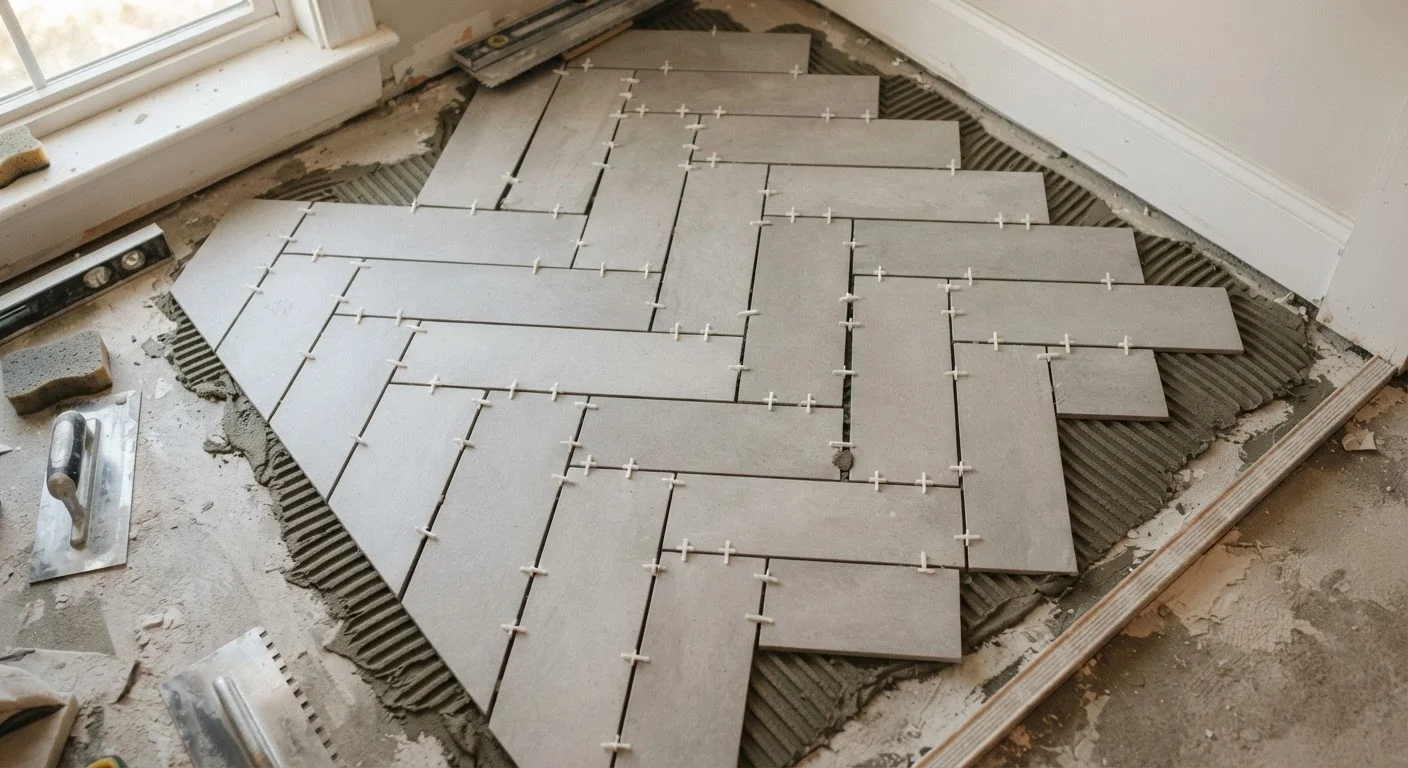
Rectangular tiles are set at 90-degree angles to each other in a V-shaped zigzag. Herringbone adds strong visual movement and works especially well in narrow spaces like hallways or shower niches. Expect more cuts and a 15% waste allowance.
Diagonal (45-Degree)
Standard tiles rotated 45 degrees create a dynamic look that can make small rooms appear larger. This pattern significantly increases cut complexity at walls and edges.
Always Dry-Lay Before You Set
Spend time arranging tiles without adhesive across the full area before mixing any mortar. This reveals centering issues, awkward narrow cuts at walls, and pattern misalignments when they're still easy to correct. Mark your starting lines with chalk and adjust until the layout looks balanced from the room's natural entry point.
Always dry-lay (set tiles without adhesive) your entire planned area before committing. This lets you adjust the starting point, center the pattern visually, and spot awkward slivers at walls before any mortar is mixed.
Grout Basics: Types and Application
Grout fills the joints between tiles, locks them in place, and prevents moisture from migrating beneath the surface. The right grout choice depends on joint width, location, and how much maintenance you're willing to do.
Unsanded Grout
Used for joints up to approximately 1/8 inch wide. The fine texture prevents scratching on polished or delicate tile surfaces. Common on wall tile with tight joints.
Sanded Grout
Contains fine sand particles to add body and prevent shrinkage in wider joints (typically 1/8 inch and above). The added bulk makes it the standard choice for most floor tile installations.
Epoxy Grout
A two-part mixture that cures chemically rather than drying. Highly resistant to stains, moisture, and chemicals, making it well suited for showers, kitchen backsplashes, and areas exposed to grease. It is more difficult to work with and typically more expensive, so many beginners reserve it for smaller areas or consult a professional.
Once your tile is set and cured, maintaining your grout is ongoing work. Our article on keeping wet areas watertight with grout and caulk covers long-term sealing and repair in detail.
Substrate and Surface Prep
Even the highest-quality tile will crack, pop, or shift if the surface underneath isn't properly prepared. This step is where most DIY tile failures originate.
What Makes a Good Substrate
Tile needs a surface that is flat, rigid, clean, and dry. Common approved substrates include cement backer board (such as a fiber-cement panel), uncoupling membranes over plywood, and existing concrete slabs. Standard drywall is not suitable behind tile in wet areas - it will eventually deteriorate from moisture.
Checking for Flex
Walk across your subfloor and note any bounce or give. Tile cannot flex. If the floor deflects noticeably, additional blocking or a thicker subfloor layer may be needed before any tile goes down.
Don't Skip Substrate Assessment
Tiling over a subfloor with too much flex is one of the most common causes of cracked grout and failed tiles within the first year. Before purchasing any tile, evaluate whether your floor or wall surface meets the rigidity requirements for tile. If you're unsure, consulting a licensed tile contractor for a substrate assessment is a worthwhile investment before buying materials.
Leveling Matters More Than It Looks
High spots cause tiles to rock or crack; low spots create voids under the tile that can fail under foot traffic. Use a long straightedge (at least 6 feet) to identify any variation greater than 3/16 inch over a 10-foot span - industry guidelines commonly cite this as the threshold requiring correction before setting tile.
Planning Your Project Before You Buy
Careful planning before purchasing materials helps you avoid common and costly mistakes.
Calculate Your Square Footage
Measure the length and width of the area, multiply for square footage, then add your waste allowance (10% for simple patterns, 15% for complex ones). For rooms with cutouts or alcoves, calculate each rectangle separately.
Match Your Tile to the Room
Larger format tiles (12×24 inches or bigger) can make small rooms feel more spacious but require a flatter substrate and more precise layout. Smaller mosaic tiles introduce more grout lines, which require more maintenance but offer better slip resistance on wet floors.
Order from One Production Run
Tile color and texture can vary between manufacturing batches, called shade lots. Check that all boxes share the same shade lot number, and buy enough to complete the project plus a small reserve for future repairs.
If your tiling project is part of a larger structural change - such as converting a wall layout - review the structural realities of open-concept renovations to understand how construction sequencing may affect your tile work.
Tile Council of North America (TCNA) Handbook
The industry-standard reference for tile installation methods, substrate requirements, and grout specifications used by professional tile setters across the US.
Square Footage & Waste Calculator
An online calculator that helps you estimate how much tile to order based on room dimensions, pattern complexity, and waste percentage.
National Tile Contractors Association (NTCA)
A professional association whose public resources include installation standards, contractor locators, and educational guidance for both tradespeople and informed homeowners.