

Key Takeaways
Our Verdict
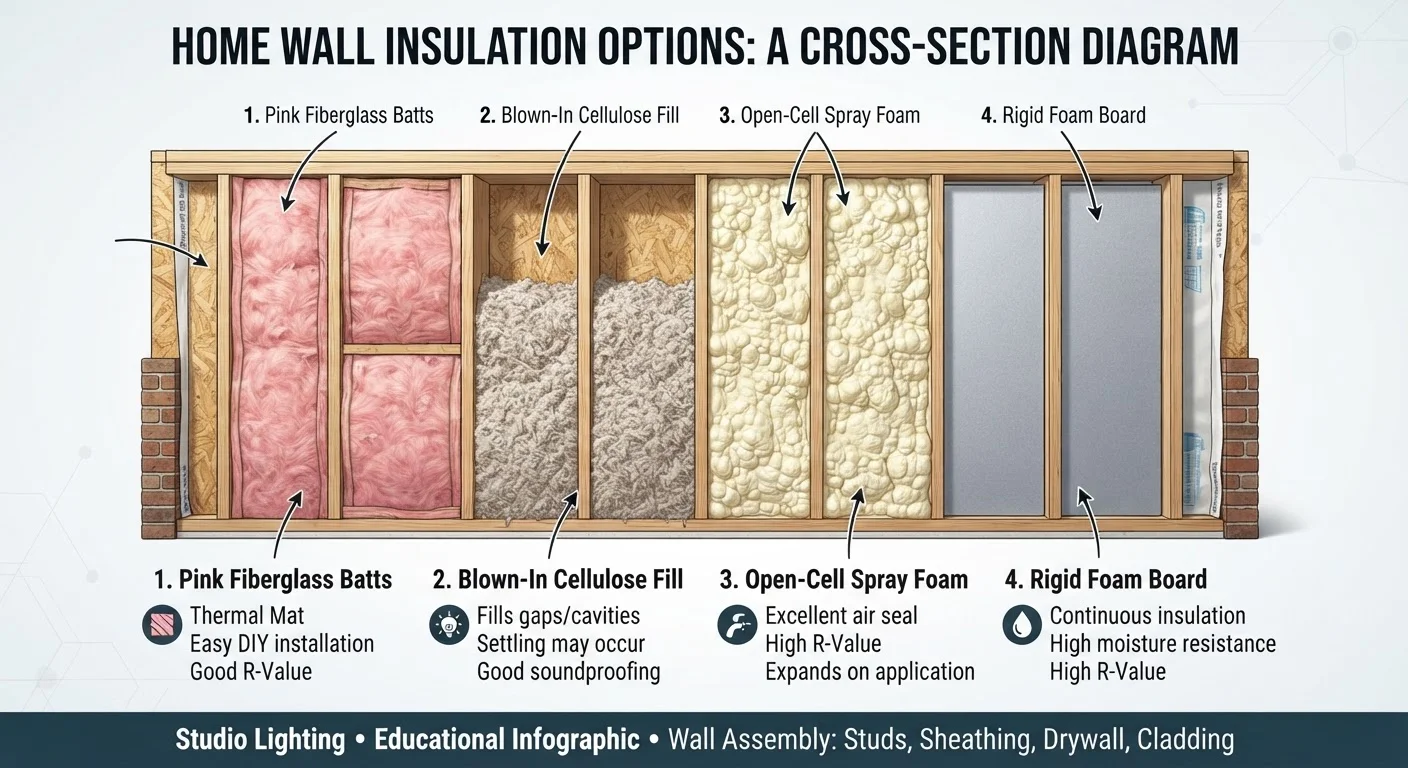
No single insulation type wins across every application. Batts offer the lowest cost and easiest DIY installation for open framing, while blown-in handles irregular or enclosed cavities well. Spray foam leads on air sealing and moisture resistance where budget allows, and rigid board fills structural gaps that other types cannot. Matching the insulation type to the specific location - not just the R-value target - produces the best long-term results.
| Best for | Recommended |
|---|---|
| DIY-friendly wall and attic projects on a budget | Batt insulation |
| Existing finished walls and oddly shaped cavities | Blown-in insulation |
| Maximum air sealing and moisture control | Spray foam insulation |
| Basement walls, exterior sheathing, and under-slab applications | Rigid board insulation |
Why Insulation Type Matters as Much as R-Value
When homeowners shop for insulation, R-value - the measure of thermal resistance - tends to dominate the conversation. But R-value alone doesn't tell the whole story. An insulation material that performs well in a lab can underperform dramatically if it's the wrong type for the installation location, if it leaves air gaps, or if moisture infiltrates over time.
The four main residential insulation types - batts, blown-in, spray foam, and rigid board - each have distinct physical properties that make them suited to specific parts of a home. Understanding those differences helps you choose the right material for each project rather than defaulting to whatever is most familiar. For a broader picture of where insulation failures tend to begin, see our guide on crawl spaces and attics.
| Batt | Blown-In | Spray Foam | Rigid Board | |
|---|---|---|---|---|
| Typical R-value per inch | R-3.1 to R-4.3 | R-2.5 to R-3.7 | R-3.5 to R-7 | R-3.8 to R-6.5 |
| Air sealing ability | None (needs separate sealing) | Minimal | Excellent | Moderate (taped seams) |
| DIY suitability | High | Moderate (rental equipment) | Low (pro recommended) | Moderate |
| Best application | Open wall/attic cavities | Retrofits and irregular spaces | Rim joists, crawl spaces | Basement walls, exterior sheathing |
| Relative installed cost | Lower | Lower to moderate | Higher | Moderate |
| Moisture resistance | Low (fiberglass), moderate (mineral wool) | Low to moderate | High (closed-cell) | High (XPS, polyiso) |
Batt Insulation: Accessible and Widely Used
Batt insulation - typically fiberglass or mineral wool - comes in pre-cut panels sized to fit standard 16-inch and 24-inch stud spacing. That standardization makes it the most DIY-accessible option for open wall cavities, attic floors between joists, and crawl space ceilings.
Fiberglass batts typically achieve R-values between R-11 and R-15 per 3.5-inch stud bay (standard 2×4 framing), while mineral wool batts in the same thickness reach R-15 to R-16 and add fire resistance. The critical installation detail is fit: batts must fill the cavity completely without compression or gaps. Compressed insulation loses R-value; gaps allow convective air movement that bypasses the insulation entirely.
Cut Batts Slightly Wide for a Better Fit
When fitting batt insulation between studs or joists, cut the piece about a half-inch wider than the cavity opening. This friction fit holds the batt in place without fasteners and eliminates the edge gaps that reduce thermal performance. Use a straight board as a cutting guide and a sharp utility knife for clean cuts.
Batts do not air-seal. For best results, pair batt installation with caulk or foam at penetrations - our article on caulking, weatherstripping, and sealants covers where each product belongs.
Blown-In Insulation: The Go-To for Retrofits
Blown-in insulation - made from cellulose (recycled paper fiber) or loose-fill fiberglass - is installed using a blower machine that pneumatically deposits material into a space. This makes it uniquely effective at filling irregular cavities, reaching around obstacles like wiring and pipes, and topping up existing attic insulation without disturbing finished surfaces.
Cellulose runs approximately R-3.7 per inch and is treated with borate compounds for fire and pest resistance. Loose-fill fiberglass runs roughly R-2.5 to R-3.7 per inch depending on density. Both settle over time, which contractors typically account for by installing above the stated target depth.
For enclosed existing walls, a technique called drill-and-fill - boring small holes in the exterior or interior surface to inject material - allows insulation upgrades without a full wall teardown. This is one of the most cost-effective retrofit strategies available.
~90%
Homes with inadequate attic insulation
The U.S. Department of Energy estimates that about 90% of existing U.S. homes are under-insulated, with attics being the most common deficiency.
15-20%
Heating and cooling loss through air leaks
The EPA's Energy Star program estimates that air leaks account for 15-20% of heating and cooling energy loss in a typical American home.
Spray Foam: Superior Air Sealing at a Higher Cost
Spray polyurethane foam (SPF) expands on contact to fill every crack and irregular surface, providing both insulation and air sealing in a single application. It comes in two formulations: open-cell foam, which is softer and vapor-permeable with R-values around R-3.5 to R-3.8 per inch, and closed-cell foam, which is rigid, moisture-resistant, and delivers R-6 to R-7 per inch.
Closed-cell spray foam is particularly valuable in areas prone to moisture - crawl spaces, rim joists, and rooflines - because it resists vapor diffusion. Open-cell foam is often used in interior applications such as interior wall cavities and attic rafters where some vapor permeability is acceptable.
Spray foam installation involves chemicals that off-gas during curing and requires full protective equipment. Professional installation is strongly recommended, and occupants should vacate the space during application and for a period after, per the installer's guidance. Costs are substantially higher than batt or blown-in options, but the combined insulation-and-air-sealing benefit can reduce the need for additional sealing work. Pair any insulation upgrade with a review of weatherproofing your home before winter.
Rigid Board: Structural Spaces and Continuous Insulation
Rigid foam insulation boards - available in expanded polystyrene (EPS), extruded polystyrene (XPS), and polyisocyanurate (polyiso) - provide a continuous insulation layer that eliminates thermal bridging through studs and joists. This makes them valuable in applications where other insulation types don't fit: basement walls, exterior wall sheathing, under concrete slabs, and garage doors.
R-values vary by product: EPS runs approximately R-3.8 per inch, XPS about R-5 per inch, and polyiso around R-6 to R-6.5 per inch (though polyiso's effectiveness decreases in cold temperatures). Rigid board is cut with a utility knife or table saw and can be installed by experienced DIYers in many applications, though basement and exterior sheathing installations often involve building-code considerations.
One key requirement: most rigid foam products require a thermal barrier (typically 1/2-inch drywall) on interior surfaces because foam is combustible. Check local building codes before leaving foam exposed in finished spaces.
This article is for general informational purposes only. Always verify local building codes and permit requirements before beginning any insulation project, and consult a licensed contractor for work involving electrical, structural, or hazardous materials.